Open Broadcaster Software ( OBS ) - Setup | Basic
It is a free and an open source software for video recording and live streaming. Basically it is used for live streaming on different platforms like YouTube, Facebook, etc. using a unique key.
It performs the high performance real time video and audio capturing and mixing. It create scenes made up of multiple sources including window captures, images, text, browser windows, webcams, capture cards and more and give as a video output in the real time.

 Browser: It displays a website or web content from the web address provided in the properties of that source.
It performs the high performance real time video and audio capturing and mixing. It create scenes made up of multiple sources including window captures, images, text, browser windows, webcams, capture cards and more and give as a video output in the real time.
It is freely available on https://obsproject.com for Windows, MacOS, Linux.
Introduction to OBS user interface :
Scenes:
It generates different scenes which can be switched between each other during the stream. Scenes allow us to make different screens on which elements are inserted and customized according to our requirement.
To add a new screen click on " + " and type the name then press OK, a new screen will be generated.
Sources:
For each screen we can customize a display design for the real time stream. To add a new source click on " + " and select the types of source that is required to display on a scene.
OBS provides the following sources:
 Browser: It displays a website or web content from the web address provided in the properties of that source.
Display Capture: It shows a particular display in real time during the stream. So, it will show the active window on that display.
Window Capture: It only shows a window on a display irrespective of the other window in that display.
Video Capture Device: It takes the input from Video input device i.e, camera connected to the computer.
Text: It display the text in a scene.
Note: Size of each source can be changed as per requirement
Note: Size of each source can be changed as per requirement
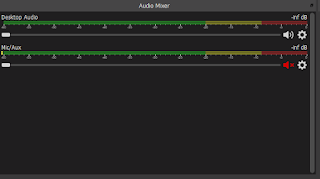
Audio mixer:

It allows to control the audio levels of all the applicable sources. Audio from a particular source can be enabled and disabled. Audio can also be modified by using audio filters available in the Filter in Setting icon next to the individual audio. Compressor, Expander, Gain, Invert Polarity, Limiter, Noise Gate, Noise Suppression are available.
Scene transition:
During switching between the scenes the transitions are available which make the switching smooth.
Transition like Fade, Cut, Stinger. And time duration for transition is also customized.
Controls:
This panel consists of option to Stream, Record, Studio Mode.
Stream: Final output can be streamed to the link of the service using a unique confidential key to that service.
Record: This option enables us to record the stream locally in the computer. It can be used with or without Streaming in real time to a service.
Studio Mode: In this mode preview of the scene and the source can be done turning them to main output. Preview and Main Output panels are adjacent to each other.
Saving the scenes:
The scenes can be exported for later use. It can be done under the Sequence Collection Menu, both import and export option are available.How to live stream to YouTube:
In order to stream on YouTube, first we need to create the scene sequence made of up multiple sources. After this enter the stream key under the stream option in Setting in Control.
So, in order to get the unique stream key go to http://youtube.com/live_dashboard and scroll to the encoder setup and copy the key from there and paste it to the OBS stream key option.
Warning: The key should not be shared with anyone. If someone have your key then they can stream to your channel without login credentials of YouTube.

Comments
Post a Comment