Posts

Emmet in Sublime Text 3

Image
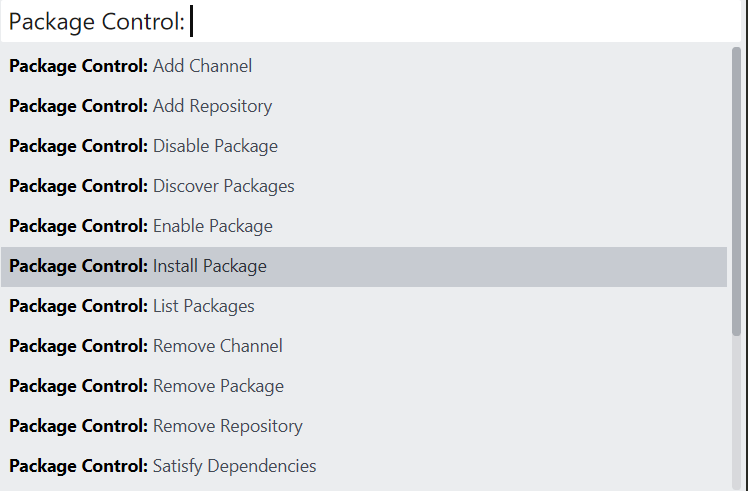
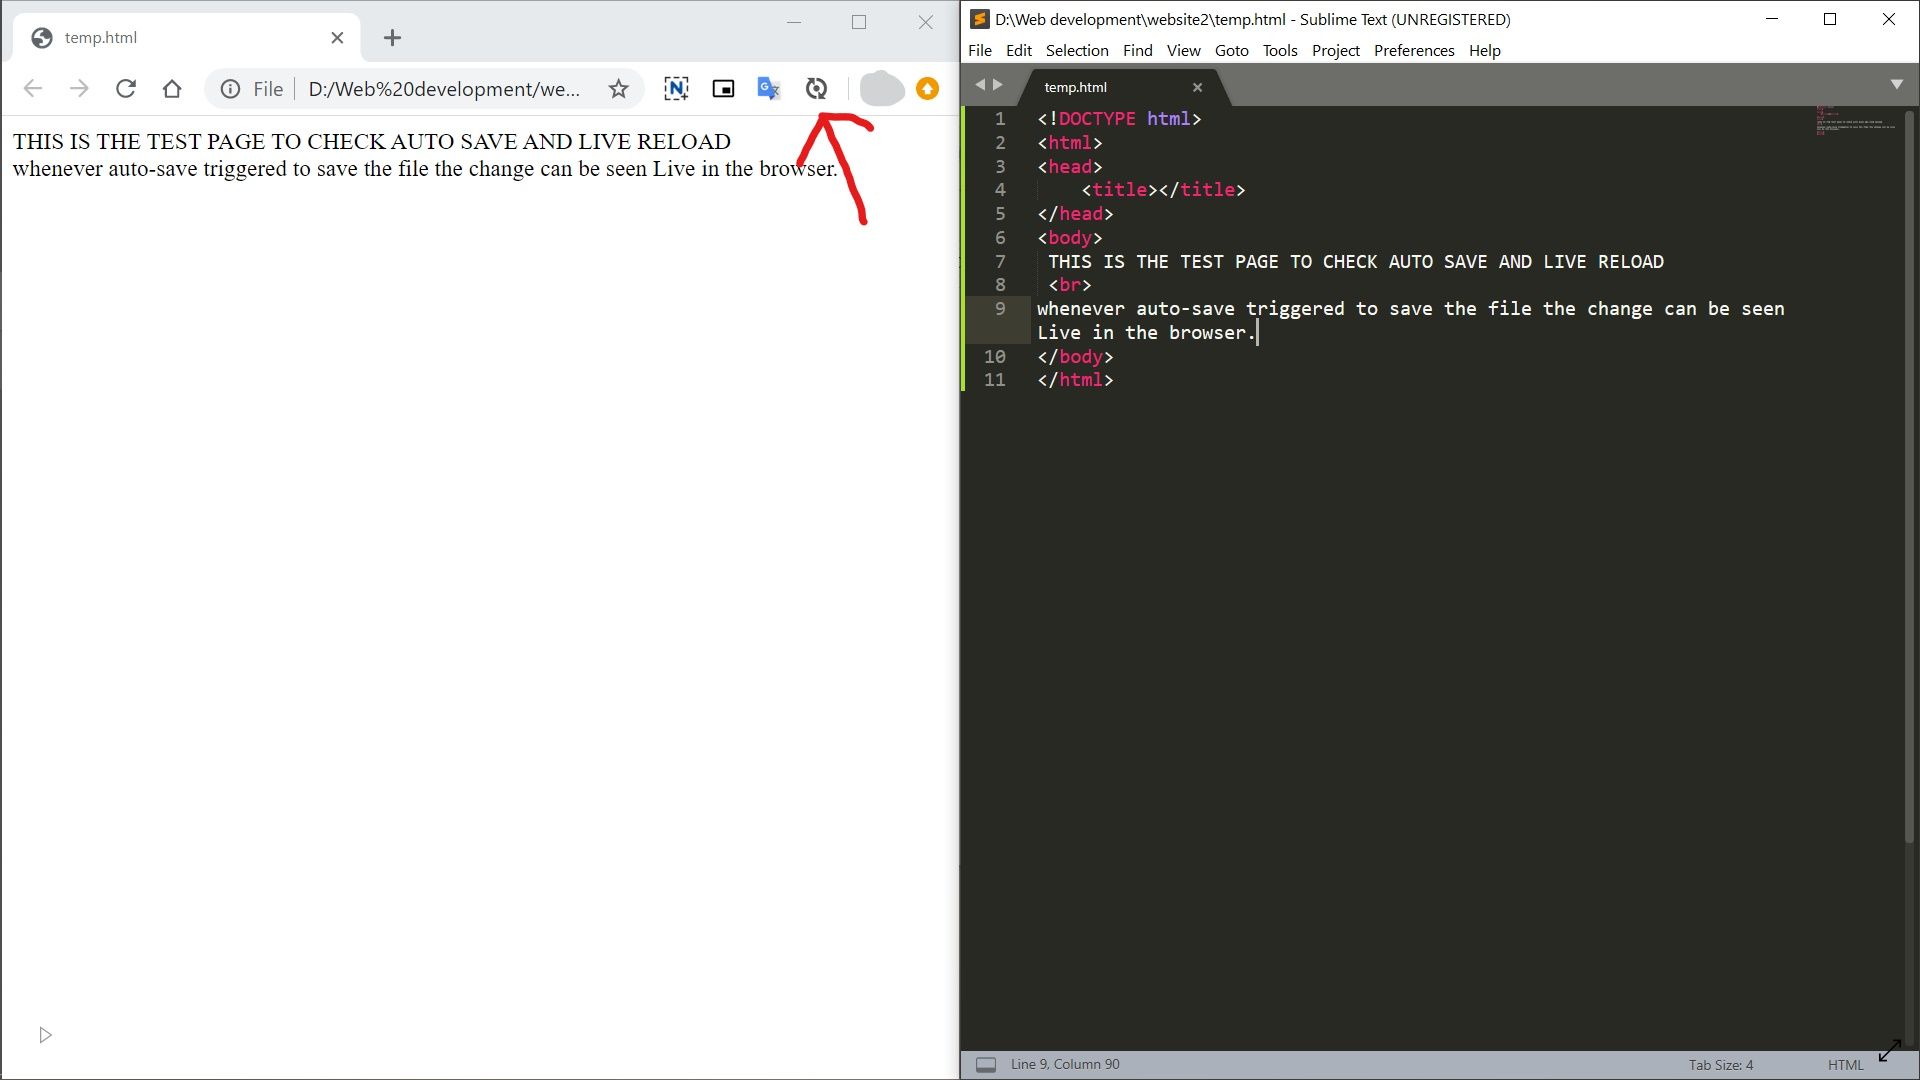
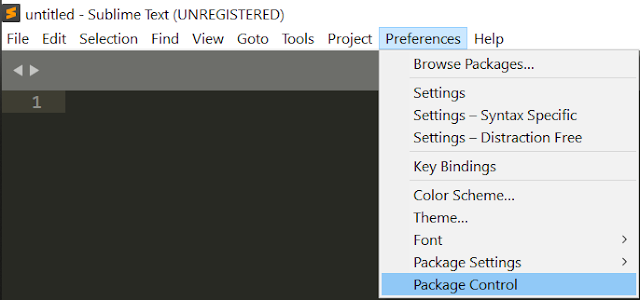
Emmet is a very useful plugin to boost the productivity and save time. It helps in development of product with more efficiency. In Sublime Text 3 Emmet auto completes the syntax for web design languages like HTML and CSS. To install Emmet follow this :   Sublime Text 3 >> Preferences >> Package Control >> Install Package >> Emmet. Syntax for Emmet : Child: > nav>ul>li <nav> <ul> <li></li> </ul> </nav> Sibling: + div+p+bq <div></div> <p></p> <blockquote></blockquote> Climb-up: ^ div+div>p>span+em^bq <div></div> <div> <p><span></span><em></em></p> <blo

Color Picker in Sublime Text 3

Image
While developing the web page, everyone must have faced the problem in finding the color code during testing that which color is suitable. It is hard to change and guess the color code value. To solve this problem there is a plugin named Color Picker in Sublime Text 3 which makes possible to chose color based on hex value, RGB value, HSL value or directly using the color picker. Follow these to install color picker : Sublime Text 3 >> Preferences >> Package Control >> Install Package >> ColorPicker Now search for ColorPicker and click on it to install. Once the Color Picker has been installed then it can be launched using the shortcut command Ctrl+Shift+C . If not launching then try to restart the Sublime Text 3. ( Color Picker Interface )

LiveReload and Auto-save simultaneously in Sublime Text 3

Image
Every front end developer must have encountered the problem that every time the web code is updated in the editor they have to refresh the browser each and every time. It becomes a hectic when the code is updated very often and the result is observed in parallel. So, here's the solution for this problem. This tutorial is for Sublime Text 3 Editor. The solution is to install the LiveReload plugin in Sublime Text 3 and its extension in the browser. Refer for tutorial on installing LiveReload . While writing the website code in Sublime Text 3, it lacks for Auto-Saving the code. Repeatedly saving of code lead to less efficiency of the web coder. To over come this a plugin named Auto-Save can  be installed. Refer for tutorial on installing Auto-Save . Now as you have installed Auto-Save and LiveReload  plug-in, so whenever auto-save triggered to save the file the change can be seen Live in the browser.

Auto save in Sublime Text 3

Image
While writing the website code in Sublime Text 3, it lacks for Auto-Saving the code. Repeatedly saving of code lead to less efficiency of the web coder. To over come this a plugin named Auto-Save can  be installed. To install the plugin follows the steps given below. Steps to install and enable Auto-Save: Step 1 : Sublime Text 3 >> Preferences >> Package Control >> Install Package >> Auto-Save   Step 2 : Preferences >> Package Setting >> Auto-Save >> Key Bindings-User A file will open and copy the below code to the file. It will bind commands to turn the plugin on or off. [     {"keys":["ctrl+alt+s"],"command":"auto_save" ] and now save this file. To toggle it for only the current file, and instruct to make a backup of the file instead of saving the file itself, you could add: [ {"keys": ["ctrl+al

LiveReload webpages during editing in Sublime Text 3

Image
Every front end developer must have encountered the problem that every time the web code is updated in the editor they have to refresh the browser each and every time. It becomes a hectic when the code is updated very often and the result is observed in parallel. So, here's the solution for this problem. This tutorial is for Sublime Text 3 Editor. The solution is to install the LiveReload plugin in Sublime Text 3 and its extension in the browser. Follow these steps to load the LiveReload package in ST3: Step 1 : Go to Sublime Text 3 Preferences >> Package Control >> Install Package >> LiveReload * Wait for a while to load the below search box and type for LiveReload when the library loads :  Step 2 : Restart the Sublime Text 3. Step 3 : Go to chrome and navigate to extension store in chrome to install the LiveReload extension for Chrome. Step 4 : Now in chrome go to More too

How to disable VLC Media Player Flashing Pop-Up track notification on Taskbar

Image
Sometimes it becomes hectic when the next video in a playlist is playing in the backgroung and VLC media player is flashing pop up track notification on the Taskar. This can be disabled as follows: Go to  Tools -> Preferences   (set Show Settings to All at bootom left corner) The similar dialog box will appear. Now go to Main interfaces -> Qt Choose "Never" in the drop down menu named Show notification popup on track change. Press Save to save VLC settings and restart VLC after that to make sure changes are enabled.

Excel with VBA-Excel

Image
VBA stands for Visual Basic for Application. It is an event driven programming language used with MS-Excel, MS-Word. Accessing the VBA editor Go to File>> Option >> Customize Ribbon >>   Tick Developer >> Press OK Click on Developer Ribbon and then click on Visual Basic.   Shortcut: Press ALT+F11 This is the VBA interface.   Writing the first Code ( Custom Formula) In VBA code is written in Modules. So, Modules can be inserted by navigating to Insert >> Module. Now in Module, Procedures are written. These are group of instructions (statements). There are two types of Procedure:  a) Sub  b) Function These both eliminates the need of writing the same from multiple times. This allows to make custom user defined functions. Here is the example of a user defined function in excel. So, the code snippet can be used as the Formul

Open Broadcast Software ( OBS ) - VirtualCam | Google meet | Zoom | Other video conferencing App

Image
In the previous blog, basic OBS was introduced and learnt that how to stream on YouTube using OBS.  Now suppose we want to share the video output in real time on video conferencing platform like Google Meet/ Hangout, Zoom, Facebook or any other app/website that use camera of the computer device. This can be resolved using the OBS as a VirtualCam. Means that the output of the OBS is available as a virtual camera. Thus, in the setting of individual platform of video conferencing , only requirement is to change the camera from the main camera to the OBS-VirtualCam. In this blog the procedure to setup the OBS-VirtualCam will be discussed further. Setting up the OBS-VirtualCam: Browse to the Resources section in the OBSproject website or follow the link  https://obsproject.com/forum/resources/obs-virtualcam.539/  , Download the plugin and install it while closing the OBS. Now open OBS and check under the Tools menu the VirtualCam option will be available. This means Virtual Camer

Open Broadcaster Software ( OBS ) - Setup | Basic

Image
It is a free and an open source software for video recording and live streaming. Basically it is used for live streaming on different platforms like YouTube, Facebook, etc. using a unique key. It performs the high performance real time video and audio capturing and mixing. It create scenes made up of multiple sources including window captures, images, text, browser windows, webcams, capture cards and more and give as a video output in the real time. It is freely available on  https://obsproject.com  for Windows, MacOS, Linux. Introduction to OBS user interface : Scenes: It generates different scenes which can be switched between each other during the stream. Scenes allow us to make different screens on which elements are inserted and customized according to our requirement. To add a new screen click on " + " and type the name then press OK, a new screen will be generated. Sources: For each screen we can customize a display design for the real time s

WiFi controlled BOT using local website

Image
In this project I have made a WiFi controlled Bot using arduino uno and ESP8266 WiFi module. The two wheeled bot is controlled from a local website that can be opened in the browser using a predefined specific IP address of the ESP8266. The local webpage code is stored in the arduino uno and it will be send to the browser when requested. Once the page is loaded in the browser then commands are sent back to the arduino using the Wifi module. The default IP address is 192.168.4.1 I have developed this project without  use of any library. Components needed: Arduino Uno -------- 1 Dc geared motor ----2 Wheel----------------- 2 Chasis ----------------1 ESP8266 -------------1 L293d------------------1 9v battery ------------1 Working Video: Arduino Code: /*  * This code is written by TRISHANK SINGH MAHUR.  * This is the code for esp8266 wifi module. In this the esp8266 is used as the local server.  * The website is locally ho